
Jack
This is a fast, athletic, well-sequenced driver swing from a player who clearly has speed and knows how to use the ground - the lower body leads, the trail heel is off the deck by frame 13, and the finish at 18-23 is a tall, held, tour-looking position on a fully released trail toe. The engine is good. What is costing you is the middle: the head and upper body drift toward the target during the backswing (compare the head at frame 0 to frame 6 - it moves left and drops) so you are loading onto the lead side before you have finished turning, and at the strike in frame 13 the head has come back but the chest is already very open with the arms working hard to catch up. That combination - centre drifting forward going back, then having to hang back through the ball - is why the strike looks like it needs timing rather than being repeatable. The backswing also takes roughly 10 frames while the downswing takes 3, which is real speed, but some of that "quickness" from the top is the arms rescuing a sway rather than a coil unwinding. Fix the centre of the backswing and the impact position you already flash becomes the one you own.
Swing video
What’s working
The finish is genuinely tour-standard: from frame 18 through 23 you are stacked on a straight lead leg, trail foot vertical on the toe, chest to the target, and you hold it dead still for a full six frames. That is not a saved finish - that is a balanced one, and it tells me the speed you are producing is inside your control.
Ground use and lower-body lead are real. By frame 13, one frame before the ball is gone, the trail heel is already climbing and the lead leg is bracing - the pelvis is driving the strike rather than the shoulders spinning it. Most recreational players are still flat-footed at that point.
The address package is clean and organized: hip-hinged forward bend, driver-width stance, arms hanging under the shoulders, and a completely still pre-shot moment across frames 0-2 with no fidgeting or regripping.
Highest priorities
- 1
Stop the head and upper centre drifting toward the target in the backswing. Between frame 0 and frame 6 your head moves visibly left and down - that is a reverse-direction load, and it forces you to hang back through impact to find the ball. Turn the trail hip behind you and keep the head where it started.
- 2
Get the chest to match the hips at the strike instead of over-rotating past them. At frame 13 the upper body is already wide open while the hands are still arriving - the arms are being asked to time the face. Keep the chest closed a fraction longer and let the pelvis lead by a clear margin.
- 3
Widen and steady the top. Because the club exits the frame you cannot see it, but the drift in frames 5-7 tells me the arms are lifting to compensate for a centre that has already moved. Load into a braced trail side first, then let the arms finish the swing.
Four positions that shape the swing.
Annotations point only to features visible in the selected frames.
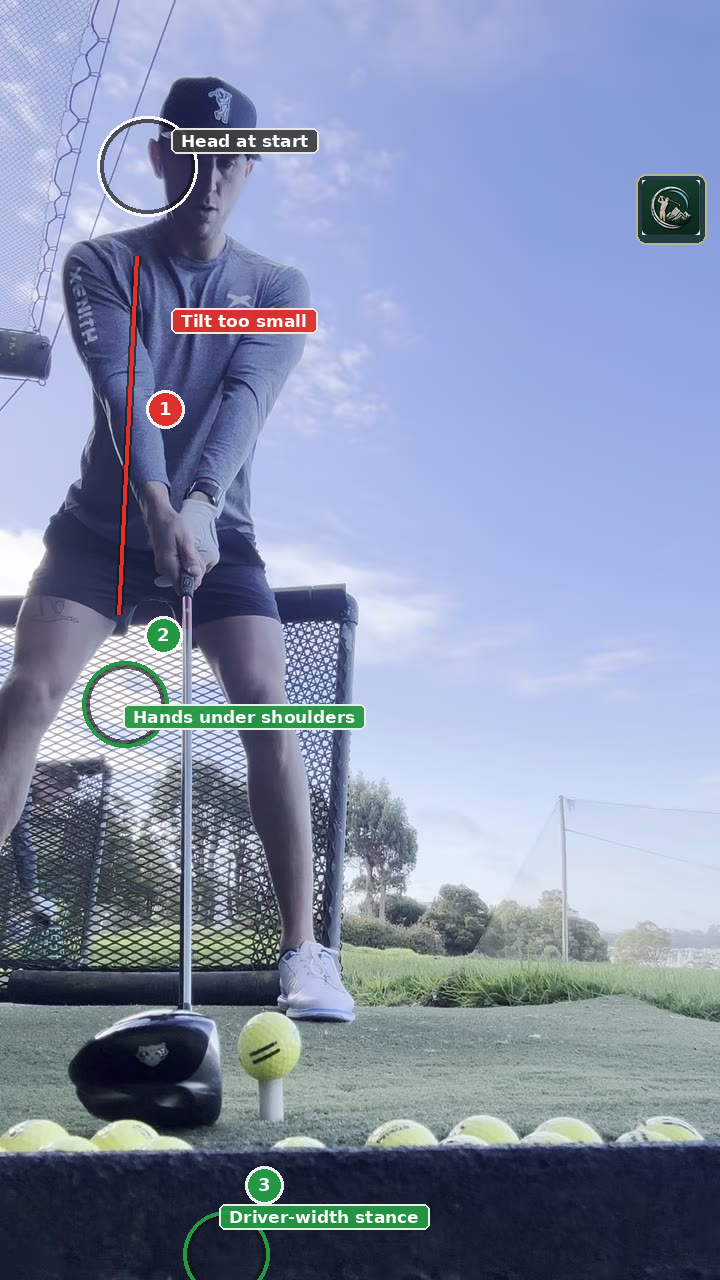 01
Address / setup
- head at start
Note this head position precisely - it is your reference point. Compare it to the top of the backswing and you will see how far your centre travels toward the target before the club ever comes down.
- 1tilt too small
For a driver the spine should lean noticeably away from the target with the head clearly behind the ball; here it is nearly vertical. That flat tilt is the root cause of the forward drift you get in the backswing.
- 2hands under shoulders
Genuinely good - the arms hang freely beneath the shoulders with the handle low and relaxed rather than propped or reaching. Keep this.
- 3driver-width stance
Stance width is correct for the driver with the insteps outside the shoulders, giving you a base wide enough to turn against - the problem later is not width, it is that you slide off it.
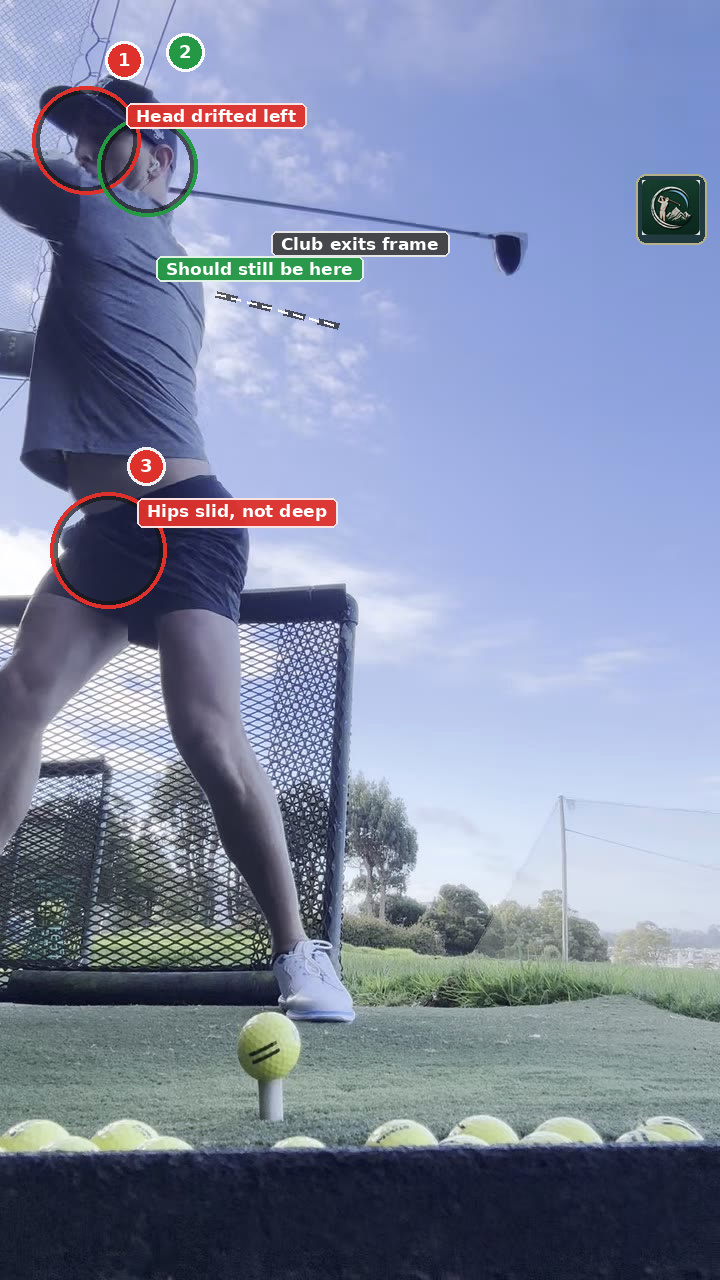 02
Top of backswing
- 1head drifted left
Compare this to your address head position - the centre has moved toward the target and dropped during the backswing. You are loading onto the lead side before the coil is finished, which forces you to hang back to find the ball.
- 2should still be here
This is roughly where the head sat at address. Coiling with the head parked over this spot stores real torque against a braced trail side instead of trading it for lateral slide.
- 3hips slid, not deep
The pelvis has travelled toward the target rather than the trail hip turning behind you. Depth in the backswing comes from rotation, not from moving the whole base sideways.
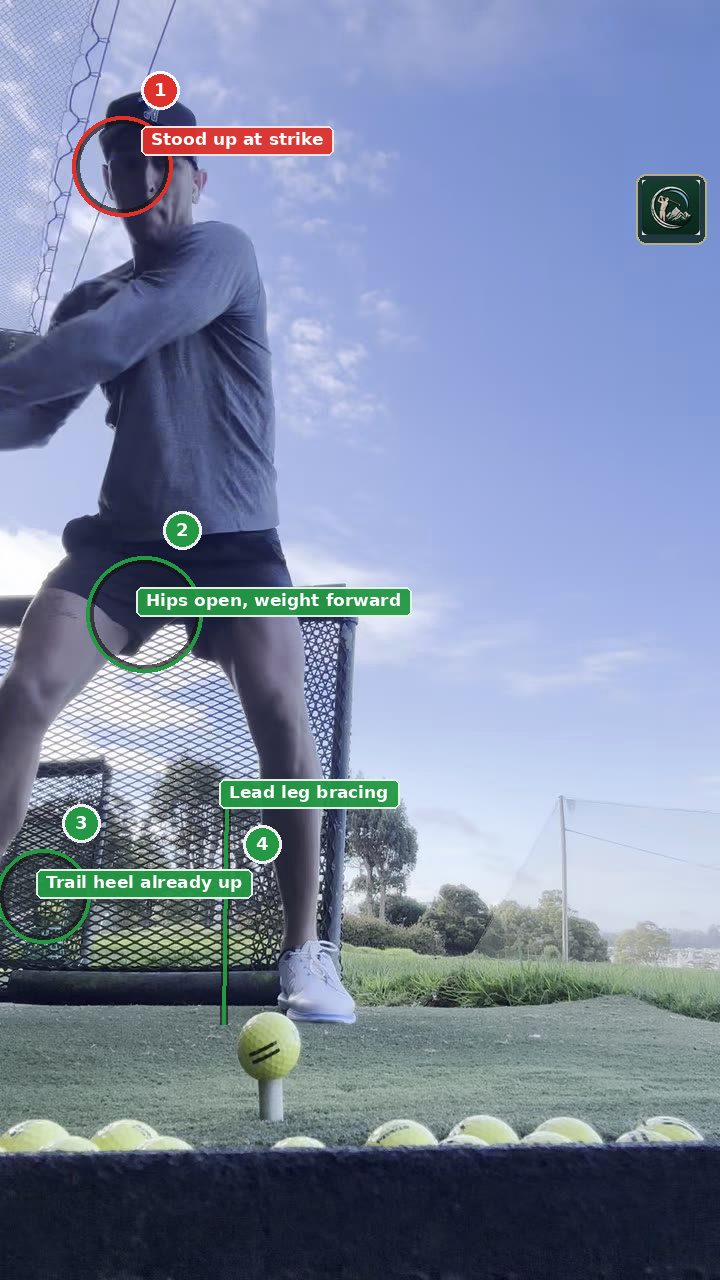 03
Impact
- 1stood up at strike
Compared with address the head is higher and the driver tilt is gone - you are extending upward through the ball rather than staying in your posture. With a driver that pulls the low point forward and makes the strike a timing move.
- 2hips open, weight forward
This is the good part: the pelvis is clearly open to the target with the weight stacked into the lead side one frame before the ball leaves. Keep this - just get the chest to stop racing it.
- 3trail heel already up
The trail heel is climbing before the ball is gone, which means rotation is pulling it rather than you pushing off. That is real ground use and a sign the sequence starts from the bottom.
- 4lead leg bracing
The lead leg is posting up and accepting the load, giving the rotation something to work against. This is what lets the finish be as balanced as it is.
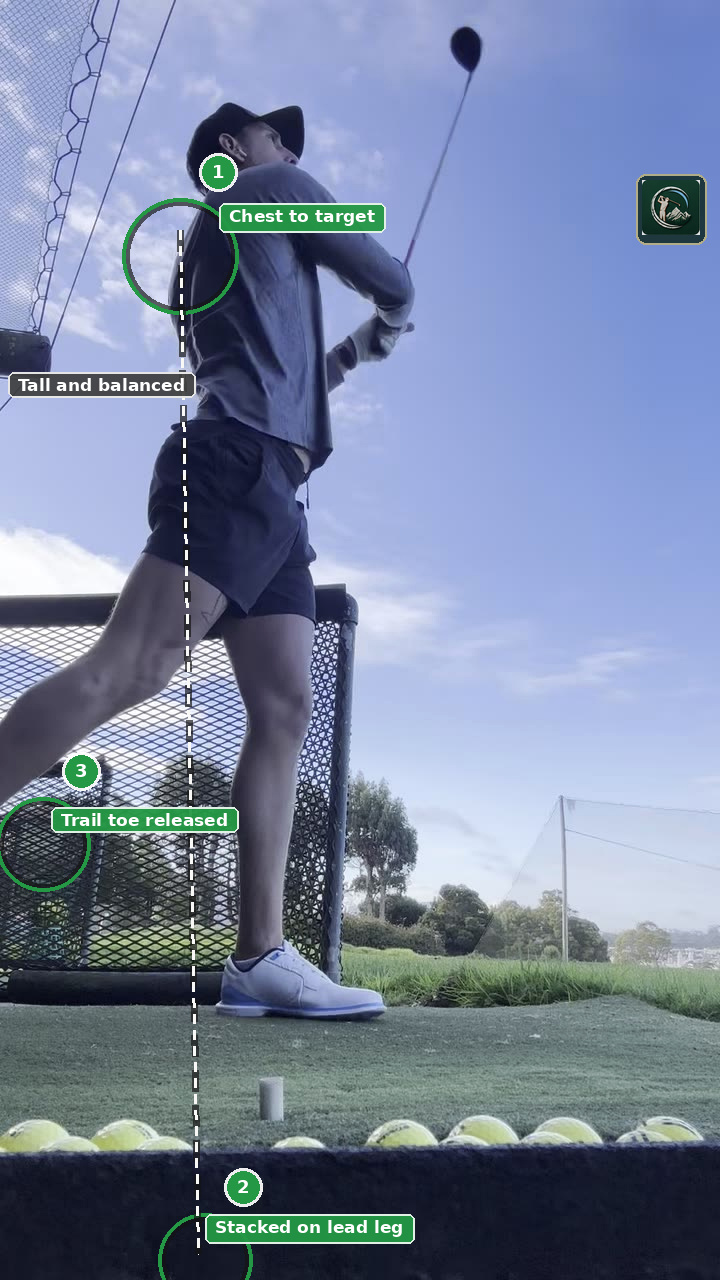 04
Finish
- 1chest to target
Full rotation completed with the chest and belt buckle facing the target - nothing left behind, nothing forced. This is the position the rest of the swing should be built to repeat.
- 2stacked on lead leg
All the weight is on a straight lead leg with the foot flat and quiet - held still for six straight frames from 18 to 23, not saved after a stumble.
- 3trail toe released
The trail foot has released fully onto a vertical toe, which only happens when the pelvis has genuinely cleared. Textbook.
The complete read.
Each checkpoint is scored from one to five based on visible swing positions.
Setup
10 / 15Frames 0-2 show a real athletic setup: the forward bend clearly comes from the hips with the chest out over the toes at roughly 30 degrees, and the stance is comfortably driver-width with the insteps outside the shoulders. The knee flex is present but sits a touch soft and back toward the heels rather than loaded mid-foot, and the handle is a shade high with the hands sitting close to the thighs. Push the shins forward slightly and let the handle drop an inch.
Face-on I can see the ball is teed forward of centre and the spine has a small tilt away from the target - but for a driver that tilt is smaller than it should be; the head is barely behind the ball at frame 1. That shallow tilt is a root cause of the drift you get later. The pre-shot stillness across frames 0-2 is excellent - no waggle, no foot shuffle, just an organized start.
The hands look unified on the handle with no visible separation and the lead wrist is flat at frame 1. Forearms are soft and in front of the chest, hands hanging roughly under the chin with sensible space. Nothing here is a fault; nothing here is tour-perfect either - the handle sits slightly high, which subtly encourages the arms to run the show. The calmness in the hands at address is genuinely good.
Backswing
9 / 15Frames 3-4 show the club, hands and chest starting back reasonably together - the triangle holds through the first foot or so. Face-on I cannot judge whether the head stays outside the hands or rolls inside, so that checkpoint is not scorable from this camera. What I can see is the lower body: by frame 4 the hips and upper centre have already begun sliding toward the target instead of staying braced. That is a sway, and it is the seed of everything downstream.
The chest does coil - by frames 6-7 the back is turned to the camera, which is a real turn. But the trail hip does not go behind you; instead the whole pelvis slides toward the target through frames 5-7, so depth is being replaced by lateral movement. Track the head from frame 0 to frame 7 and it moves visibly left and drops. Feel the trail glute move back and away while the head stays over the ball, and you will get the same coil without the drift.
The club and hands leave the top of the frame between frames 7 and 11, so shaft plane and hand height at the top simply cannot be judged from this clip - I will not guess them. What frame 10 does show is a lead arm holding its structure and a body position that is loaded enough to start down from the ground. It is not a rescue position, but the forward-drifted centre means less coil is stored than the turn suggests.
Downswing
8 / 10The lower body unmistakably starts the change of direction - between frames 11 and 12 the hips are opening while the club is still behind the head, with no shoulder spin or upper-body lunge. That is tour-quality sequencing at the top. Pressure is already forward, but that is partly because you drifted there during the backswing rather than shifting there in transition, so it earns functional rather than strong. Shaft plane in transition is not visible face-on.
This is the best part of the swing. At frame 12-13 the pelvis is clearly ahead of the chest, the trail heel is already off the ground and climbing, and rotation never stalls - frame 14 shows the body still turning hard through the strike with no hands-only flip. Wrist angle retention I can only partly read at frame 13; the hands look to be arriving slightly late relative to a very open chest, so there is some timing cost, but nothing is thrown from the top.
Impact & Finish
9 / 10Frame 13 shows the hips clearly open with the lead leg bracing and weight stacked forward - that is real impact. The problem is the upper body: the head has been pulled up and forward compared to address, the spine tilt away from the target is largely gone, and you are standing taller through the strike than you were at frame 1. With a driver you need the head to stay behind the ball; losing that tilt is why the arms have to do timing work. Recover the tilt by fixing the backswing drift, not by
Nothing to change. Frames 18-23 show the chest and belt buckle facing the target, hips fully cleared, all the weight on a straight lead leg, and the trail foot released onto a vertical toe. You hold it still across six consecutive frames with no stumble, no step, no re-balance. The motion also looks unhurried for the amount of speed produced - roughly 10 frames back to 3 frames down is aggressive, and you still finish in control.
Three drills.
One direction.
Build the motion slowly, then add speed only when it stays organized.
Kill the target-side head and upper-centre drift in the backswing so you coil against a braced trail side instead of sliding onto the lead foot early.
Wall-Head Coil
- Set up in your driver posture with the back of your head lightly touching a wall or an alignment stick held vertically by a friend, just off your trail ear.
- Make slow backswings to the top - the head must maintain contact or stay level with the stick the whole way back.
- Feel the trail glute travel backward and around behind you while the head stays put; if the head leaves the stick toward the target, you have swayed.
- Build up to half-speed then full-speed swings, checking the head reference after every third rep.
Restore the driver spine tilt at the strike so the head stays behind the ball instead of standing up through frame 13.
Tilt-and-Hold Impact Freeze
- Set up to a teed driver, then tilt your upper body away from the target until your trail shoulder is clearly lower and your head sits behind the ball.
- Swing to the top, start down with the lower body, and stop the swing the instant the club reaches the ball - freeze and check that your head is still behind the tee and your shoulders are still tilted.
- Hold the freeze for three seconds, then film it face-on and compare directly against frame 13 of this swing.
- Once the freeze looks right five times in a row, swing through to a full finish keeping the same feel.
Keep the chest closed a beat longer so the pelvis leads by a clear margin and the arms stop having to time the face.
Chest-Lags-Hips Step Sequence
- Start with feet together holding your driver, club at the top of the backswing.
- Step your lead foot out toward target and let the hips open while consciously keeping your chest and trail shoulder pointing back behind the ball.
- Only when the hips have fully opened do you let the chest and arms fire through to a full, held finish.
- Do ten reps at half speed, then hit five teed balls trying to keep the same hips-before-chest gap.