
Tommy
This is a driver swing built on a decent, athletic setup and a genuinely committed, accelerating downswing that finishes tall and balanced — the tempo (roughly seven frames back, three down) is real and the finish at frame 23 is held, not saved. What is holding it back is depth: the backswing is more arms-and-lift than body coil (frames 12-14 show the hands high and the shaft steep with the trail hip barely deepening), and because the pivot doesn't store much, the transition steepens and the club works down on a slightly outward path through the strike. The good news is that the athletic foundations and the through-swing are already there, so the work is almost entirely in the first half of the motion: turn the chest and trail hip deeper, and let the club fall onto a flatter plane instead of dropping from a lift.
Swing video
What’s working
The finish at frame 23 is genuinely tour-like in its balance: chest and belt buckle facing the target, weight fully on the lead leg, trail foot up on the toe, and the position is held still rather than caught after a stumble.
The downswing accelerates — the blurred shaft at frames 16-17 versus the crisp club at 14 shows real speed being applied, and the club releases fully through the ball instead of being steered.
Setup posture is athletic and repeatable: about 30 degrees of hip bend, driver-width stance, mid-foot pressure, and arms hanging free under the shoulders with the handle low.
Highest priorities
- 1
Deepen the backswing pivot. At the top (frame 13) the trail hip has barely turned behind you and the hands are lifted high and steep — the chest is doing far less than the arms. Turn the chest and let the trail hip move behind you so the club gets width and depth instead of height.
- 2
Shallow the transition. Frames 14-16 show the shaft coming down on or steeper than the plane it went up on, which is the direct result of the arm-lift top. Feel the trail elbow drop in front of the hip while the lower body turns, so the club falls rather than being pulled down.
- 3
Get the lower body more involved earlier. There is little visible pressure shift into the lead foot before the arms start down at frame 15, so the arms deliver more of the hit than they should — start the change of direction from the ground.
Four positions that shape the swing.
Annotations point only to features visible in the selected frames.
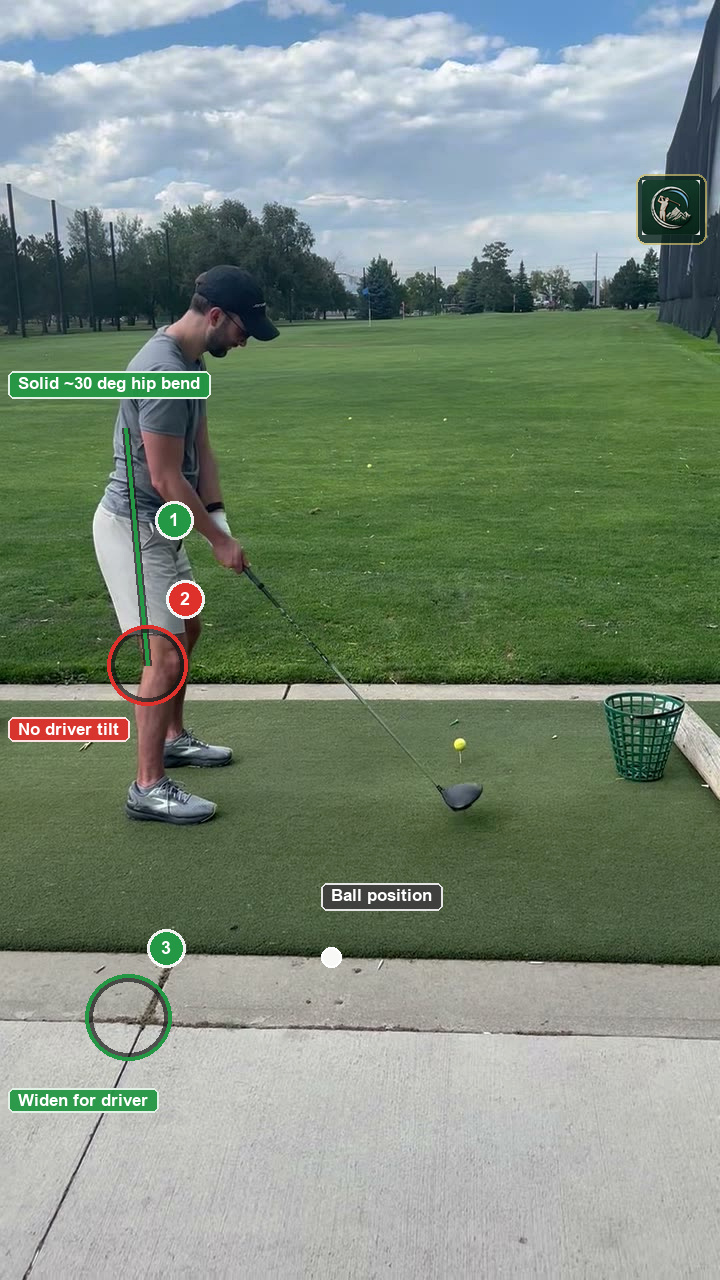 01
Address / setup
- 1solid ~30 deg hip bend
The forward bend comes from the hip joints with the chest over the toes and no slump in the lower back — this is a genuinely good athletic posture and it should not change.
- 2no driver tilt
Your sternum sits almost directly over the ball with the shoulders nearly level — for driver you want the trail shoulder visibly lower and the spine tilted away from the target so you can strike up on it. Add that tilt at address rather than trying to create it in the downswing.
- 3widen for driver
The insteps are roughly shoulder width; for driver a couple more inches of width gives you a firmer base to coil against and makes the deeper hip turn easier to hold.
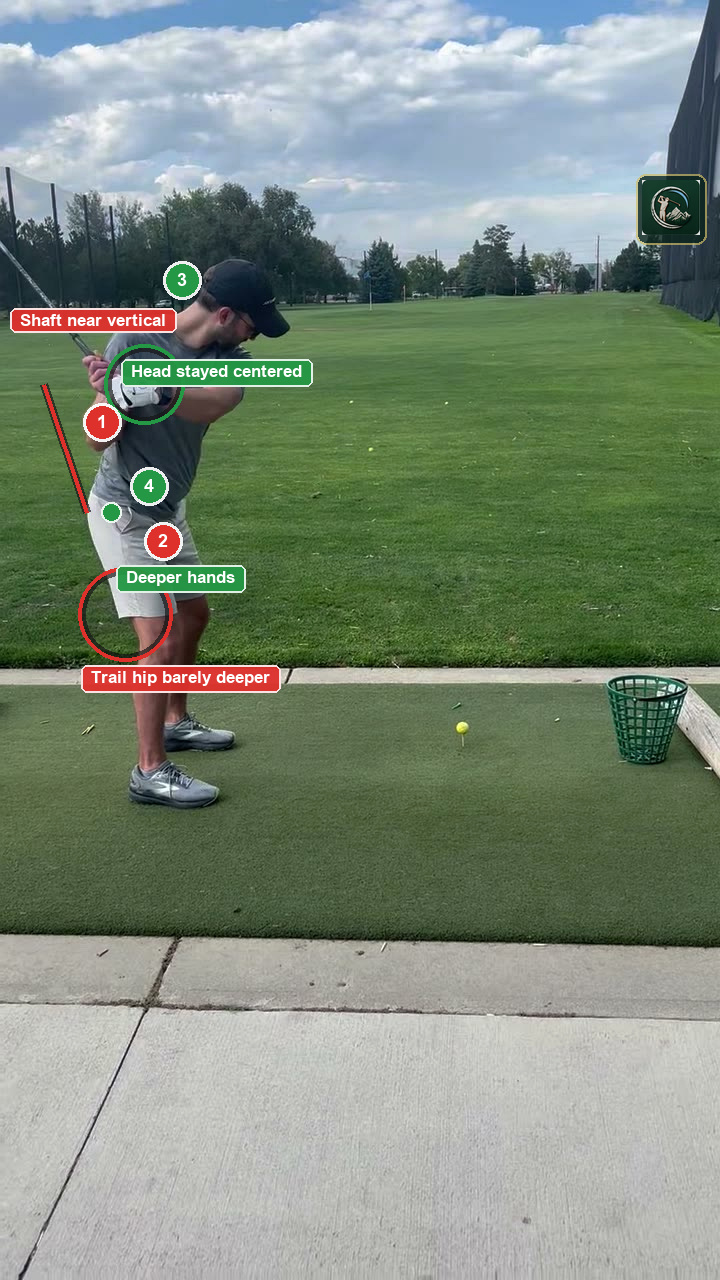 02
Top of backswing
- 1shaft near vertical
At the top the shaft is much closer to straight up than to the halfway plane you want — that is the fingerprint of lifting the arms rather than turning the body. The club should be visibly more rounded and behind you here.
- 2trail hip barely deeper
The belt line is close to where it was at address — the hips have not turned behind you, so almost nothing is stored in the pivot and the arms have to supply the speed. Feel the trail pocket move back and around.
- 3head stayed centered
No sway off the ball and no dip or stand-up out of posture — the center point is stable, which is a good base to build the deeper turn onto.
- 4target: deeper hands
Aim for the hands to sit lower and further behind the trail shoulder than they do now, with the shaft on a rounder plane — depth, not height.
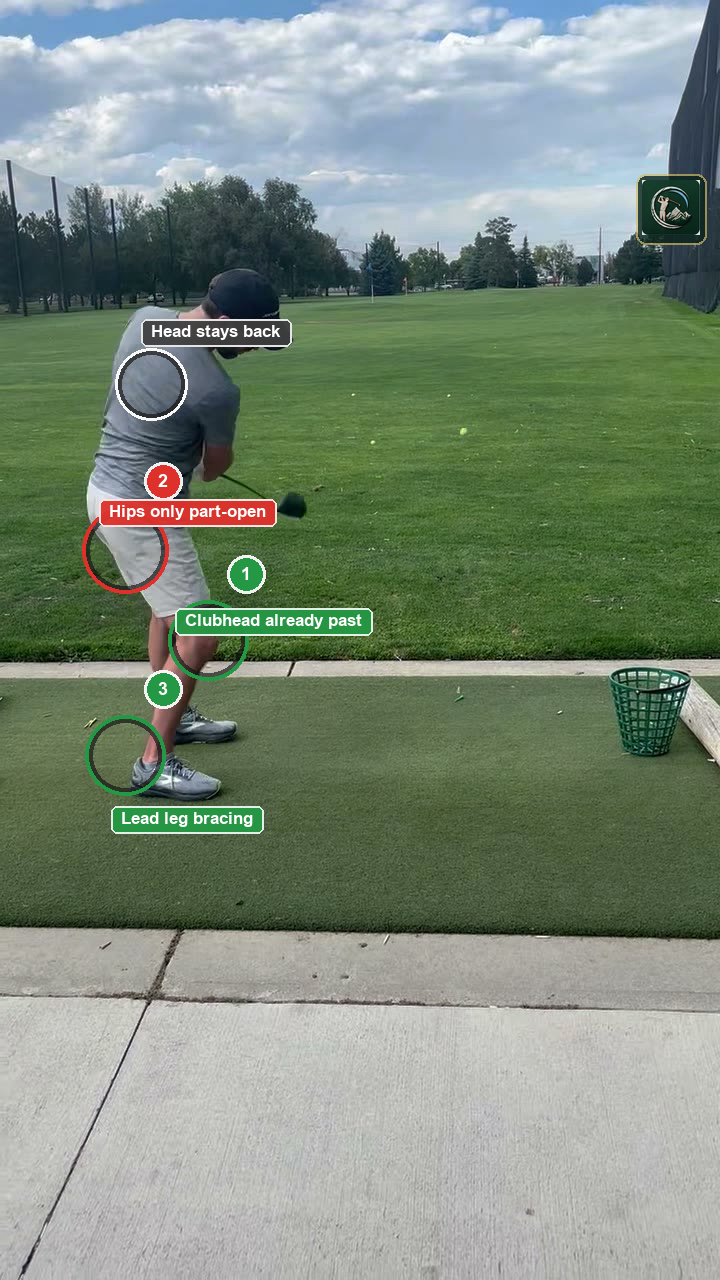 03
Impact
- 1clubhead already past
The strike falls between frames 16 and 17; here the head is well past the tee with heavy blur, which shows genuine acceleration through the ball rather than a guided pass.
- 2hips only part-open
The pelvis is opening but less than a strong driver strike wants for the amount of time it had — the shallow backswing pivot never gave the hips much room to unwind through. Deepen the turn back and this opens more on its own.
- 3lead leg bracing
Weight has clearly moved to the lead side and the lead leg is posting up rather than collapsing — this is what lets the finish be as balanced as it is.
- head stays back
No stand-up or lunge through the strike; the head holds its height and stays behind the ball position.
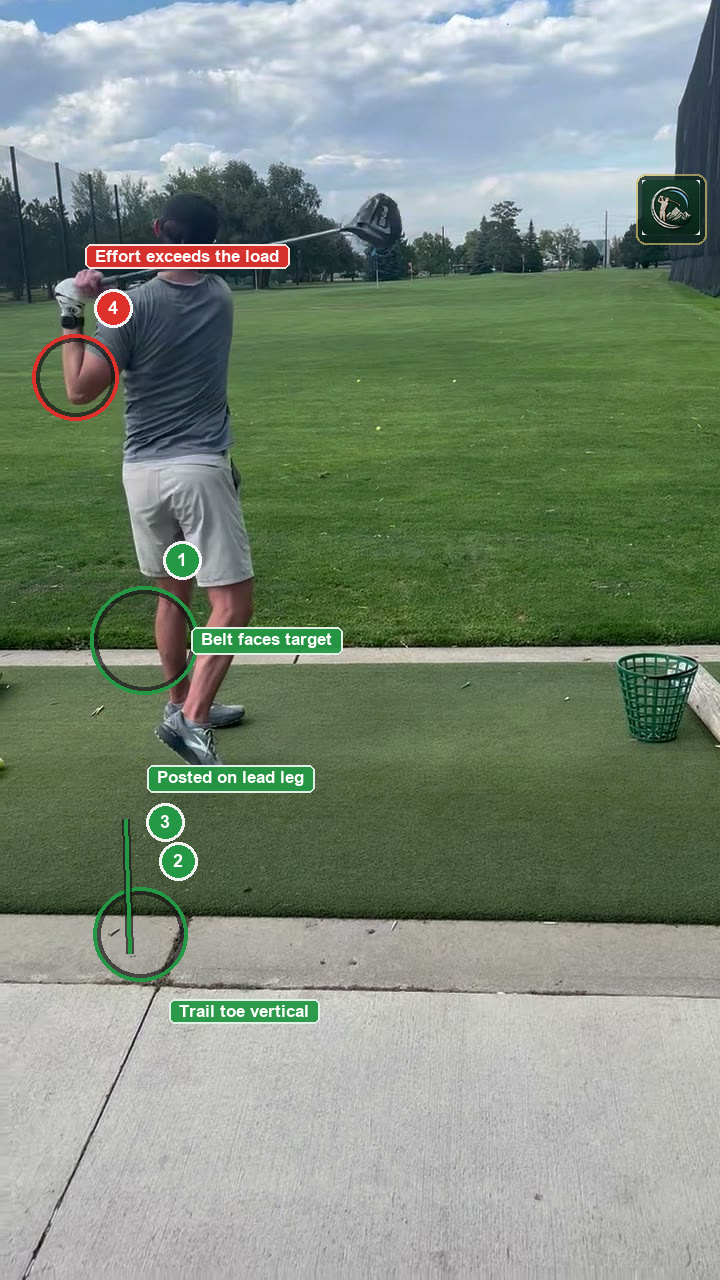 04
Finish
- 1belt faces target
Hips fully cleared with the chest and belt buckle turned through to the target — this is a complete rotation and it is the picture to protect while you rebuild the backswing.
- 2trail toe vertical
The trail foot has released all the way up onto a vertical toe with the weight entirely on the lead leg — textbook, and held still for a beat rather than saved after a stumble.
- 3posted on lead leg
Full lead-side post with no fall-back or step — your balance through the strike is genuinely good and tells me the swing was committed.
- 4effort exceeds the load
The hands finish high and hard behind the head, showing how much the arms had to supply because the body never fully coiled. With a deeper turn you will reach this same finish with noticeably less effort.
The complete read.
Each checkpoint is scored from one to five based on visible swing positions.
Setup
11 / 15The hip bend at frame 8 is close to ideal — roughly 30 degrees from the hip joints with the chest over the toes and a straight, un-slumped back, and the arms hang cleanly beneath the shoulders so the handle sits low. Stance is about shoulder width but for driver you could widen the insteps another inch or two for a wider base to turn against, and the knees look slightly soft/passive with pressure a touch heel-ward rather than firmly mid-foot.
Feet, knees and hips read as one coherent line and the shoulders roughly match them from this angle. The ball position is the issue: at frame 8 the ball sits well ahead of the clubhead but your sternum is essentially stacked over it with almost no spine tilt away from the target — for driver you want the ball off the lead heel with the trail shoulder visibly lower, which is what lets you hit up on it. You do settle into a still, organized address with no drifting feet before the takeaway.
Grip detail is hidden by the glove and the down-the-line angle so I won't guess at hand position on the handle. The hands hang nicely below the chin with correct spacing from the thighs — no crowding, no reaching. The forearms look slightly firm rather than soft, with the trail elbow a fraction high, and there is a visible waggle/regrip across frames 0-7 that suggests you're not fully settled until late.
Backswing
7 / 15At frame 9 the chest and arms move away reasonably together, but by frame 10 the clubhead has already worked inside and behind the hands rather than staying outside them — that early roll is why the club has to be lifted later to get to the top. The lower body stays quiet with no sway off the ball, which is good, and the wrists set progressively rather than snatching, but the face and path are already off-plane by the time the hands reach hip height.
This is the root of the swing's problems. By frame 13 the shoulders have turned maybe 70 degrees against a trail hip that has barely gained any depth — the belt line looks close to where it started, so the pivot isn't storing much. The head and spine stay centered with no slide or dip, which is a real positive, but the arms have clearly outrun the body: the hands are high while the chest is under-turned, which is the definition of a lift rather than a coil.
At frame 13 the shaft sits far closer to vertical than to the halfway-between-vertical-and-flat plane you want — a classic arm-lift signature. The hands finish high but not deep; they're above the trail shoulder rather than behind it, so you've traded width for height. The lead arm keeps decent structure and the wrists support the club without collapsing, and the position is balanced enough to start down from, but the load is in the arms, not the ground.
Downswing
5 / 10Between frames 13 and 15 the arms and hands are already dropping before there is any visible pressure move into the lead foot — the lead knee and hip haven't started to clear. The change of direction reads as an upper-body pull rather than a ground-up sequence, and the shaft at frame 15-16 comes down on or steeper than its backswing plane rather than shallowing. Posture and head height do hold through the transition with no early stand-up, which is worth keeping.
By frame 16 the hips have started to open ahead of the chest, so the sequence isn't reversed, but the gap between pelvis and chest is small — they're arriving nearly together, which costs you free speed. The trail heel is beginning to release at frame 17 rather than sitting flat, and some wrist angle is retained into the delivery zone, though not the deep lag of a strong player. What is genuinely excellent is that rotation never stalls: frames 17-21 show continuous body turn with no hands-flip r
Impact & Finish
7 / 10The exact strike falls between frames 16 and 17, so I'm reading the frames either side. The hips are opening at frame 17 with the chest following, but the pelvis is less open than a good driver strike wants given how much time it had. Weight has moved to the lead side and the lead leg is bracing rather than collapsing. The head stays behind the ball and the spine tilt is broadly retained with no stand-up, though the near-zero setup tilt means you were never as far behind it as a driver needs. Sh
The best part of the swing. Frame 23 shows the chest and belt buckle facing the target with the hips fully cleared, all the weight on the lead leg, the trail foot released onto a vertical toe, and the whole position held still for a beat rather than recovered after a stagger. The only reservation is that the effort in the transition slightly exceeds what the pivot earned — the finish is better than the sequence that produced it.
Three drills.
One direction.
Build the motion slowly, then add speed only when it stays organized.
Replace the arm lift at the top with a real chest and trail-hip coil so the club arrives deep instead of vertical.
Trail-Pocket Turn (Depth Over Height)
- Set up to a driver with an alignment stick or club shaft laid across the front of your hips.
- Make a slow backswing and stop at the point matching frame 13 — check in a mirror or on video that your trail hip pocket has moved BEHIND you and the stick has rotated, not just tilted.
- Only once the hip has turned, let the arms finish the swing to the top; the hands should feel lower and further behind your chest than they do now.
- Do ten rehearsals, then hit three balls at 70% trying to reproduce the deeper top.
Stop the shaft steepening in transition by teaching the trail elbow to drop in front of the hip while the lower body starts down.
Pump-and-Drop Shallowing
- Swing to your top position and pause.
- Pump the club down halfway three times, each time feeling the trail elbow tuck toward the trail hip while the lead hip starts turning open — the shaft should feel flatter than it did going back.
- On the third pump, swing through and hit the ball.
- Start with half-speed swings and build up only when the shaft visibly falls flatter on video.
Get the ground involved before the arms so the downswing starts from the feet, not the shoulders.
Lead-Foot Pressure Step
- Set up with your feet together holding the driver.
- Start the backswing, and as the club reaches the top, step your lead foot out into a full driver-width stance and then swing through.
- The step must happen BEFORE the arms start down — if you feel the arms move first, slow the whole drill down.
- Hit five stepped shots, then five normal ones trying to keep the same feeling of the lead foot loading first.